
Make a Perfect Dronelink Mapping Plan in 9 Steps
To create a drone map you need a drone, an autopilot app and mapping software (that’s Civil Tracker). We previously helped you chose a drone. If you missed that and don’t yet have a drone feel free to read the 4 Best Mapping Drones of 2024 . There are many amazing autopilot apps for DJI drones. If your drone has a mapping autopilot app built by the drone manufacturer use it. If not, use our list of the 9 best drone autopilot apps to pick one for your drone.
I’ll show you how to make two different Dronelink mapping plans and how to optimize settings for high accuracy drone mapping every time.
Optimize your Dronelink Mapping Plan for poor conditions
When planning mapping missions, the aim is to collect images that can be successfully processed into a high quality map every time. To achieve this your dronelink mapping plan needs to work in sub-optimal flight conditions. Examples include partial snow cover, low light or high winds. Designing for poor conditions includes using a higher overlap and flying a grid instead of lawnmower pattern. The trade off is longer flight times. Ready? Let’s get started.
Below are the step by step directions to planning a drone mapping mission. If you’d rather follow a video here’s a YouTube tutorial.
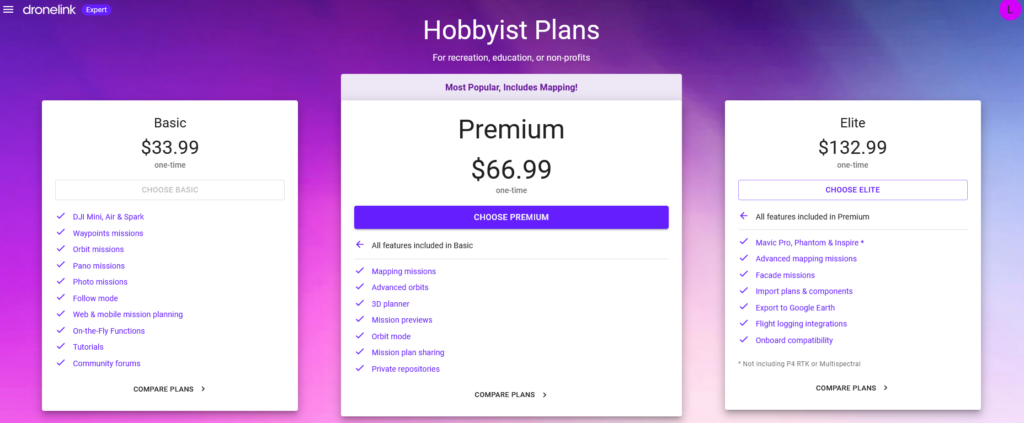
Step 1 – Sign up for Dronelink
To get a Dronelink account go to Dronelink and sign-up. Most pilots buy the Elite Plan. It allows for advanced mapping missions including cross hatch flying pattern.
Step 2 – Create a Dronelink Mapping Plan
Once you’re all signed up and logged in you can start creating your first mapping mission.
Click on the +CREATE button near the bottom left.
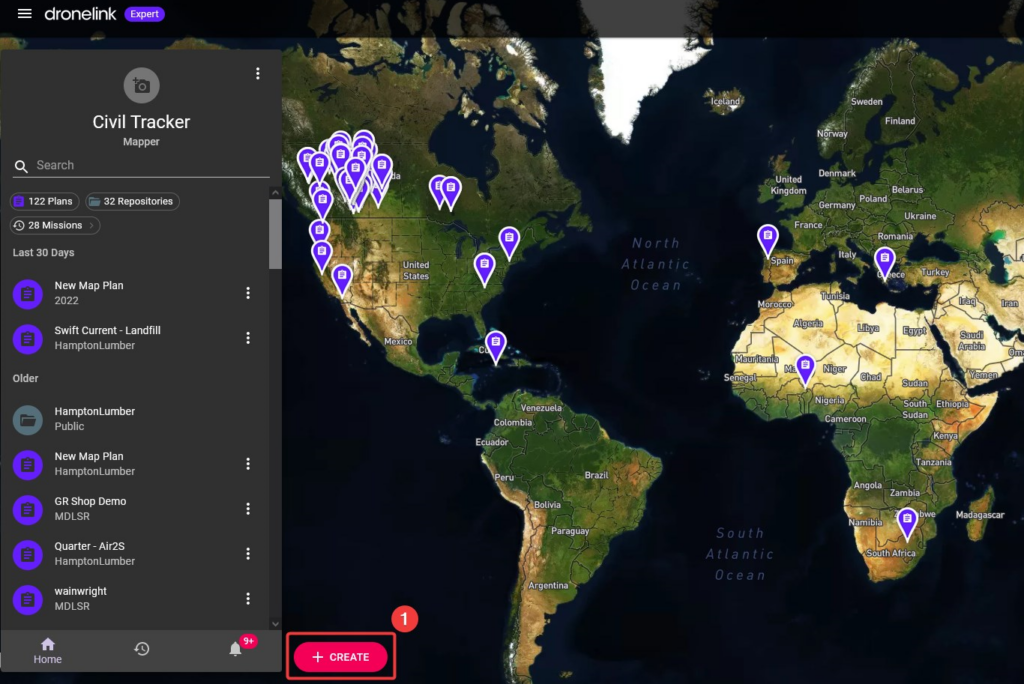
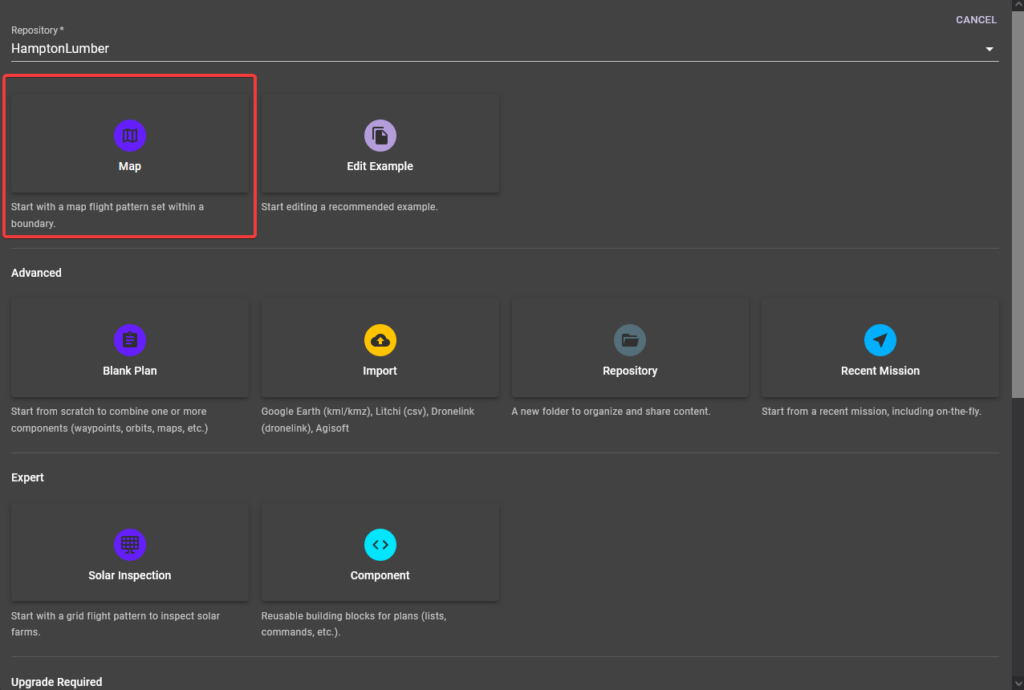
Select Map from the top left of the option menu.
Step 3 – Select Takeoff Location
Use the map functionality, zoom to the location where you want to create your Dronelink mapping plan. Then click on the approximate take off location. It doesn’t have to be perfect.
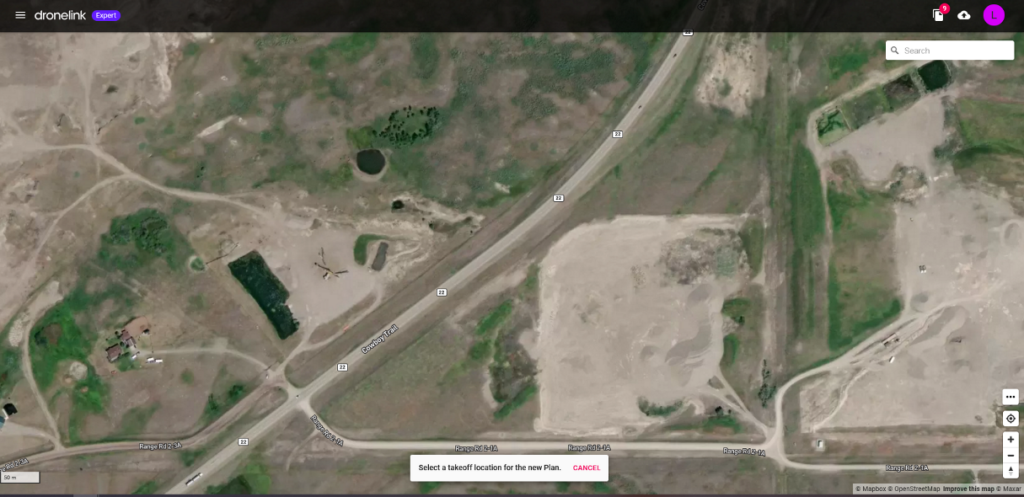
As soon as you click, an initial Dronelink mapping plan will pop up, along with the default settings.
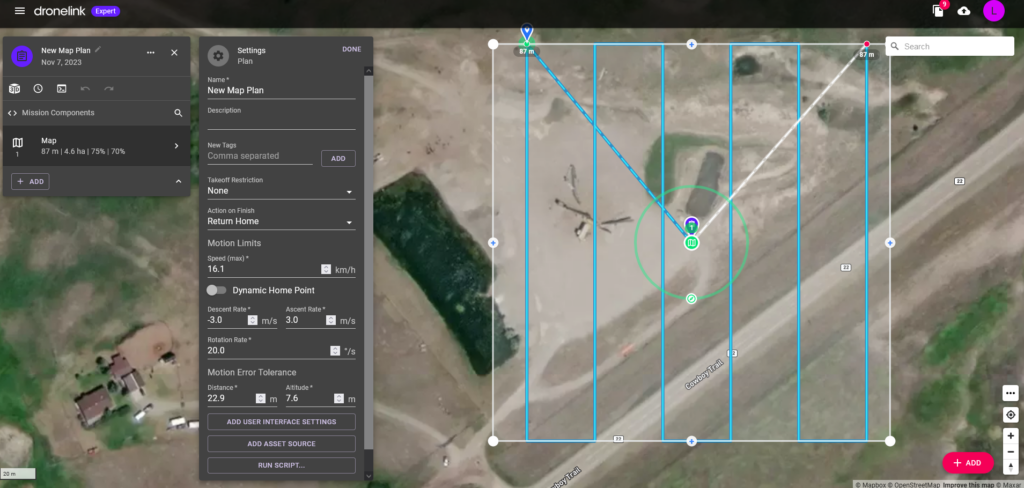
Step 4 – Adjust Mapping Plan Area Boundary
All autopilot apps allow you to draw the boundary of your planned mission. Often, you can import a kml boundary file into the autopilot app. This is useful if you have a predetermined boundary in CAD or Google Earth etc.
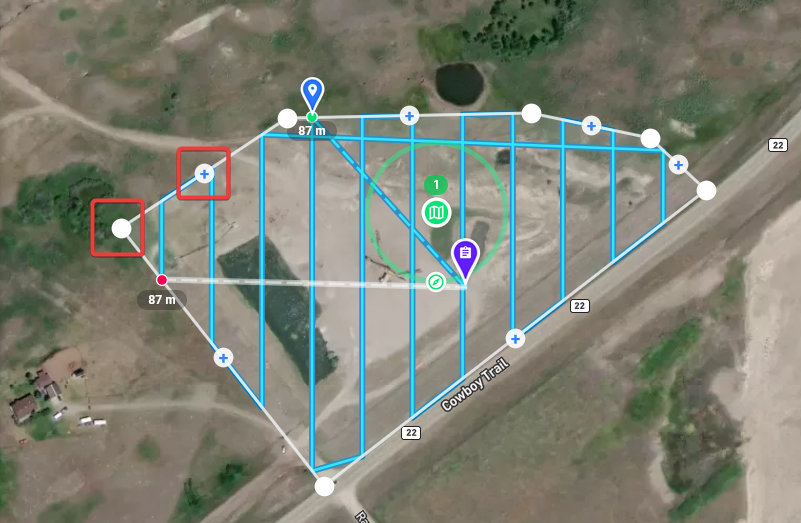
Click and drag on the white dots to move corners. Click on the white dot with a blue + to create new nodes in the boundary.
Step 5 – Name the Mission
Let’s give the Dronelink mapping plan a unique project name, so that you don’t end up with 10 identically named Dronelink Maping Plans in your account. We’ll Click on the Pencil beside the map name and then edit the name in the settings. Let’s call it the Gravel Pit Demo.
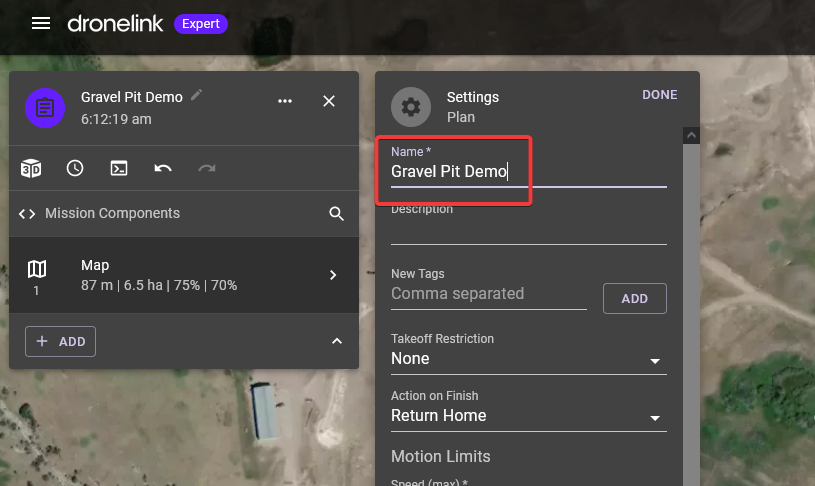
Click DONE
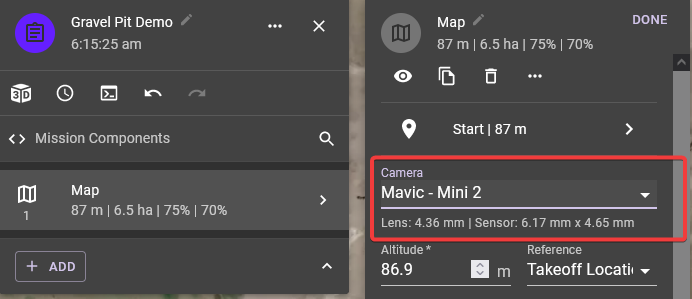
Step 6 – Select Your Drone
To edit the type of drone and the next few map settings click on the map item, this opens the map settings menu.
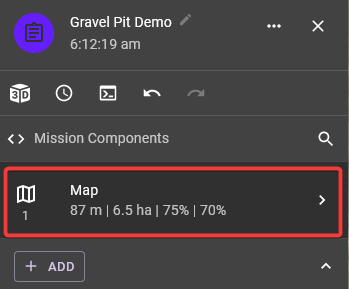
Change the camera to reflect the drone you will be using for the mission.
Step 7 – Select Your Flight Height
All mapping cameras have a fixed focal length camera. This means they don’t have an optical zoom. This may seem like a limitation, but it’s an important feature for mapping. Setting the altitude controls the Ground Sample Distance (GSD). This is what drone mappers call the resolution of each pixel on the ground. It’s the size on the ground of each dot in the image.
At 70m altitude the resolution of the camera is 2.5cm per pixel. At twice that height (140m) the resolution on the ground would be twice a large (5cm per pixel).
Generally, 1” (2.5cm) GSD is ideal for most applications. This includes viewing sites and measuring volumes.
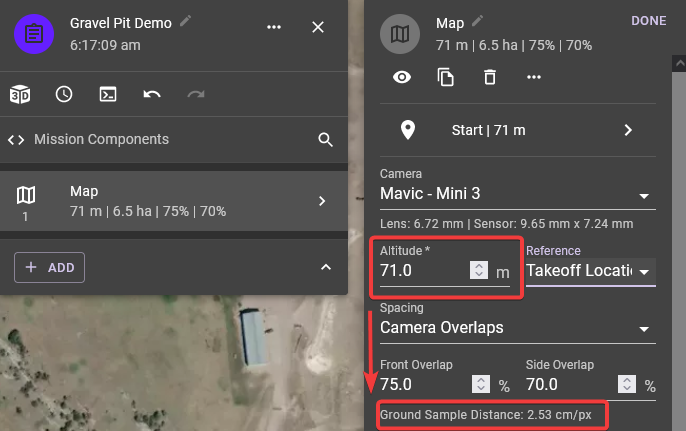
Caution: Avoid flying too low. New drone pilots tend to fly at altitudes as low as 100 ft (30m) above ground level. They assume that the lower altitude will get better results and improved accuracy. Flying this too low actually leads to lead to worse results. Generally, with few exceptions, it’s best to stay above 200′ (60m).
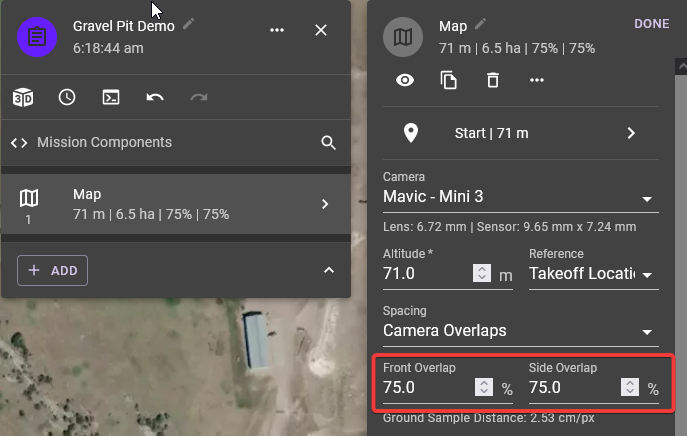
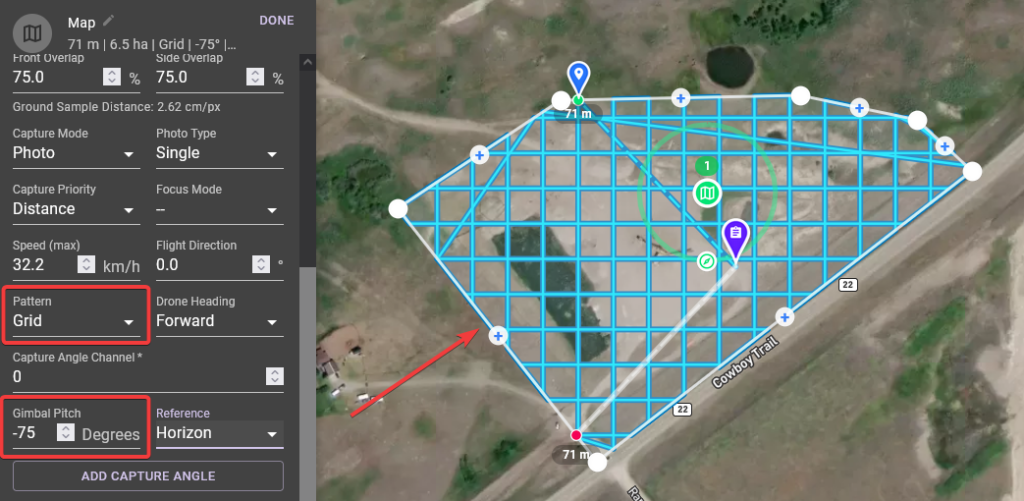
Step 8 – Set Front and Side Overlap
Overlap is an indicator of how much each photo overlaps the adjacent photo. There are two overlap parameters front overlap and side overlap.
Front overlap is an indication of distance the drone moves forward before another photo is capture. With 75% front overlap, every point on the ground shows up in 4 images, unless of course it’s the last 3 photos at the end of the flight line.
Side overlap is similar. The photos from the parallel flight lines overlap each other. Again, with 75% side overlap each point shows up in 4 images. Theoretically, with 75% side overlap and 75% front overlap a point on the ground could show up in more than 10 images.
This high overlap is needed for photogrammetry processing. The algorithms simulate the way we perceive depth. We only have two eyes, but that is enough to allow us to perceive depth. Our algorithms identify thousands of points in each image then “triangulates” from the many images to determine not only the horizontal location of that point, but also the elevation. This is the magic of how Civil Tracker uses photos to create 3D terrain models.
For a lawnmower style Dronelink mapping plan, we recommend 75% front overlap and 75% side overlap. It is possible to fly with lower side overlap, but it will increase the chance of failure in processing or getting inaccurate results.
For the grid pattern Dronelink mapping plan, we recommend 75% front overlap and 65% side overlap for terrain mapping. We can fly with a lower side overlap because we are flying in multiple directions and have higher overall overlap.
The good news is that flying a grid mission with 65% side overlap only takes 50% more flight time than a lawnmower mission with 75% side overlap. You are not fully duplicating the flight time required to map a site.
High Accuracy Flight Plan
Switch from Normal to Grid Pattern
There are two types of mapping flight patterns. For a Dronelink mapping plan they are called normal and grid. Thee names may vary in other autopilot apps. Normal is a simple and quick flight pattern that loops back and forth the way you would mow a lawn. The entire flight area is covered with parallel flight lines. Grid is a duplicate of the first flight pattern, and additionally creates a 90 degrees grid.
The normal pattern is suitable for general ortho imagery creation with low-end cameras and accurate maps with higher-end or mechanical shutter cameras. It does not achieve reliable high accuracy 3D elevation maps with low-end cameras.
The grid pattern is best suited for high volume surveys with low-end cameras or 3D modeling of buildings and structures with any camera.
The traditional approach to mapping is to have a camera facing straight down to the ground. Drone mappers call this nadir. In a Dronelink mapping plan the camera angle is -90 degrees. This setting is usually paired with the normal pattern selected in step 3.
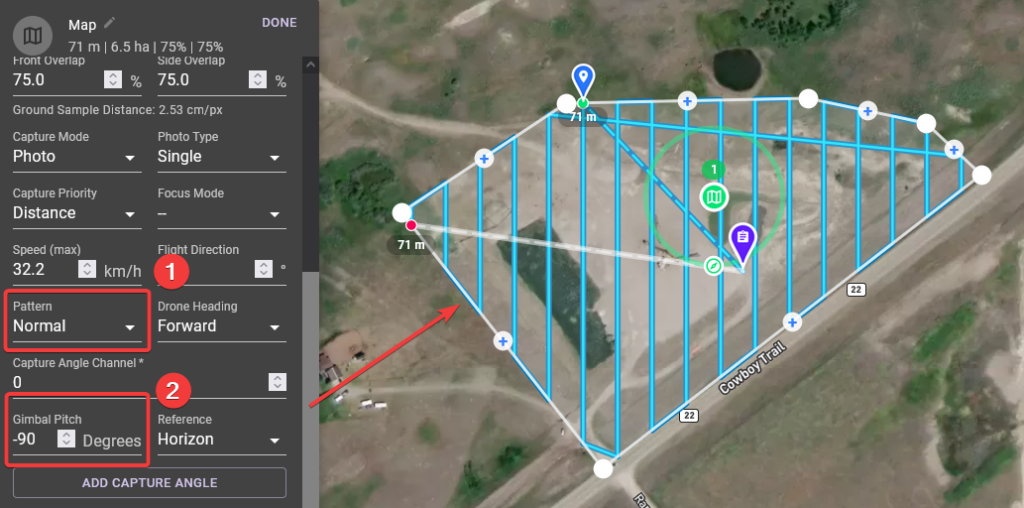
Adjusting the camera angle to face flight forward is called oblique imaging. For high accuracy terrain and volume maps, I recommend adjusting the camera angle by 15 degrees. In a Dronelink mapping plan the camear angle will be -75.
Changing the camera angle optimizes the geometry of data collection. When paired with the grid pattern every slope, building, or tree is captured from 4 sides.
In addition to optimizing geometry for the photogrammetry processing, it also optimizes the camera calibration.
To achieve consistently accurate terrain models with every flight using a small drone such as a the DJI Mini series I highly recommend creating a Dronelink mapping plan with the grid pattern and a camera angle at -75 degrees.
Step 9 – Mission Checks and Simulation
Click on the little timer button to see how much flight time the mission will take and how many photos will be captured.
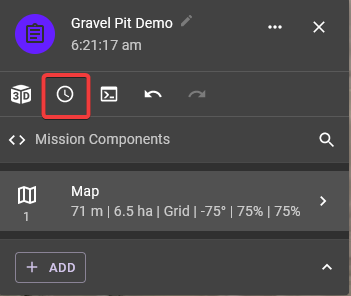
In our little example plan, we can see that the total time is 21:01 with 263 photos.

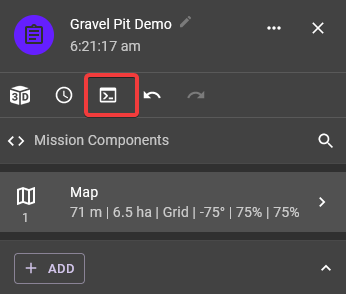
Dronelink is somewhat unique because it creates a full flight simulation. This can be valuable in complex situations or when doing your first map. Click on the button highlighted in the image below.
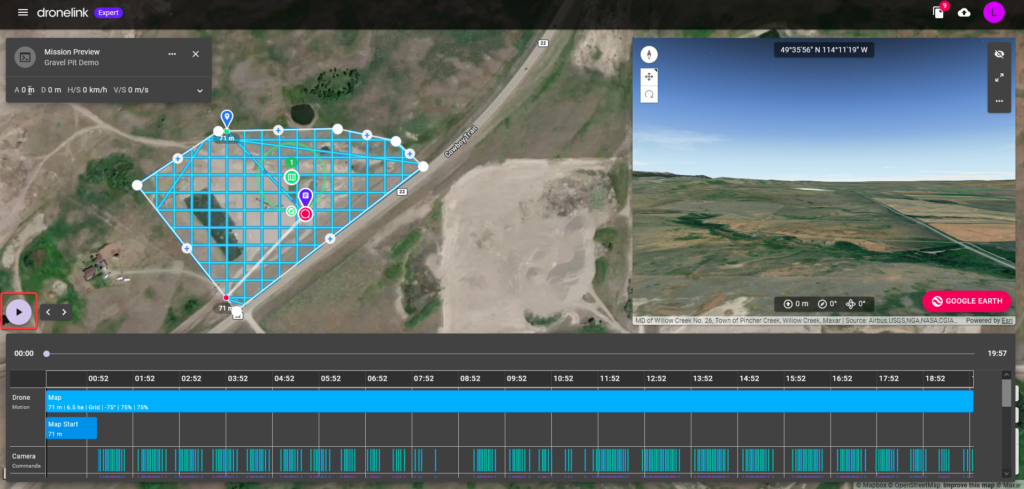
Once the preview is generated. Click on the play button to watch your simulation. The camera view is simulated with Google Earth. The simulation does a great job of showing what the drone will do and see. Pretty cool!
The Importance of a good Drone Mapping Plan
A good Dronelink mapping plan is an important step to ensure achieving your drone mapping goals. The Dronelink mapping plan determines how useful your drone data will be when upload it to Civil Tracker for processing.
Start with the end in mind
It is critical to consider your desired outcome when planning a drone mapping mission. It’s much simpler to capture a high resolution Orthophoto than it is to create an accurate terrain model for precise measurements. The questions you should ask yourself are
- What are my objectives?
- What am I planning to do with the final drone map?
Starting with the end in mind provides the right attitude towards designing a successful mapping mission. Once you understand what you are hoping to gain from the flight, your mapping mission will reflect that.
Conclusion
Making the Dronelink mapping plan is a critical process that requires careful consideration and attention to detail. By following the above process you’ll have improved your probability of making an excellent drone map.
This article is part 2 of 6 in our how to become a drone mapper training series. Find the other training articles below.
- How to pick the best mapping drone.
- Plan your first mapping mission.
- Get out and fly!
- Upload your first flight to Civil Tracker.
- Unleash the power of viewing, measuring and exporting data in Civil Tracker.
- Implement Ground Control Points on your project.
The next step is to get out, fly your drone and collect your images.
How can Civil Tracker help you?
Civil Tracker is drone mapping software that takes hundreds of photos and turns them into imagery and 3d terrain models for viewing and measuring. Our customers are in the Waste Management, Engineering, Aggregate, Mining and Municipal industries. Sign up for a free trial of our drone mapping software.
Our team has over a decade of experience in drone mapping and drone data. If you have any questions or queries, please reach out to us at support@civiltracker.xyz