Fly & Collect Great Drone Mapping Data
In our previous article, we created a drone mapping plan. If you don’t have a mapping plan yet, go back and checkout this article for some helpful tips How to Make the Perfect Dronelink Mapping Plan.
Now, it’s time to head outside. It’s simple to complete your drone mapping flight at the local ball diamond, but complex if you’re working on an industrial site. While I can’t cover every scenario in this article, my goal is to give you a good sense of what to do for the majority of the conditions you will encounter.
Office Planning
There are a few steps to review before you head outdoors and start flying. First, check the weather, then look into site access, and finally choose a take-off and landing location. You’ll also update your drone firmware and ensure that all your equipment is fully charged. In addition, when considering site access, it’s important to assess the site’s airspace to see if it’s uncontrolled.
Check the Weather Forecast
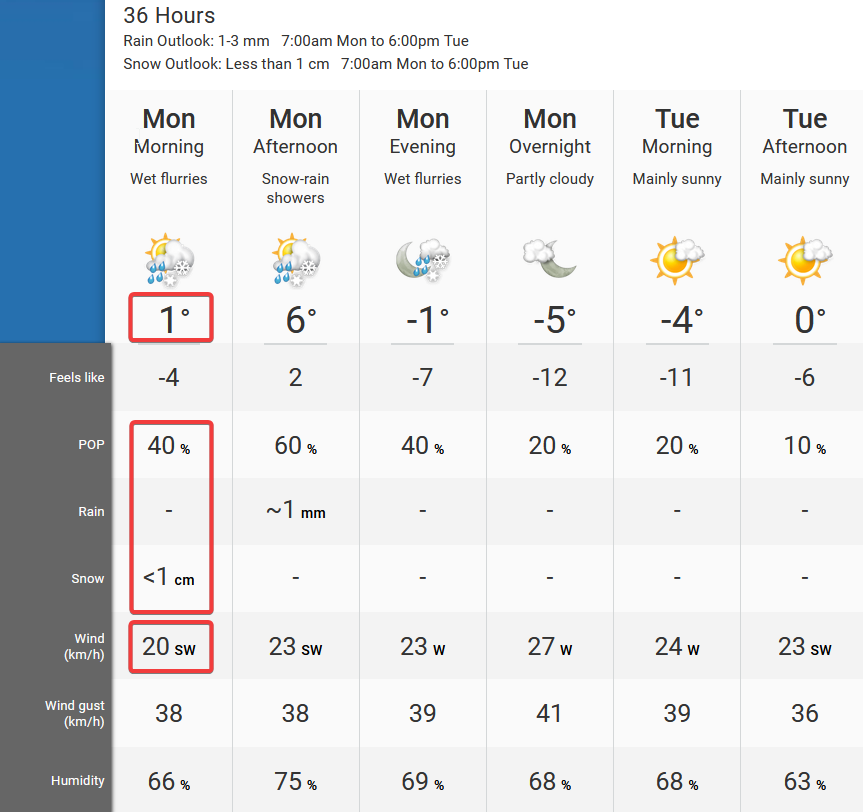
It’s a good idea to look at the forecast the day before, and the day of the drone mapping flight. There are many free and paid options available.
My favorite free option is The Weather Network. It provides temperature, precipitation and wind forecast, the three big items for drone mapping.
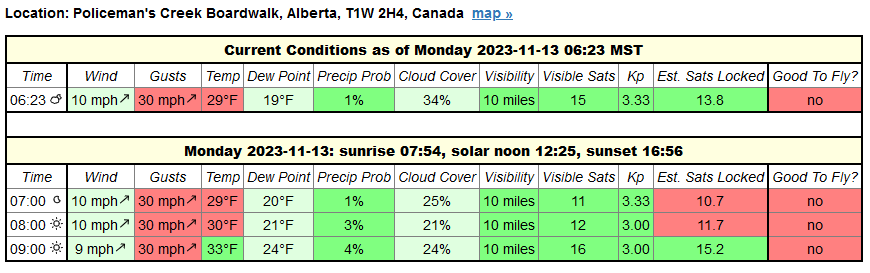
My favourite paid forecast is UAV Forecast. Most areas have daily trends when it comes to wind. Often calm in the morning with increasing winds in the afternoons. UAV forecast illustrates this well and helps me plan when in the day I should get my flights completed. While UAV Forecast offers a free 3-hour forecast, this isn’t much more use, than looking out the window. When I’m completing drone mapping for work, the 7-day hourly forecast for $3.99 monthly, is well worth the price.
If the forecast isn’t good, then adjust your plans accordingly and postpone the flight.
Site Access
It’s important to consider site access and site safety. Is the site fenced and gated? If so, do I need an access key and permission to fly? If it’s a public access site, should I be concerned about members of the public being there, etc.?
Ensure that you have all necessary permissions. Comply with all your national and local drone regulations.
Take off and Landing Location
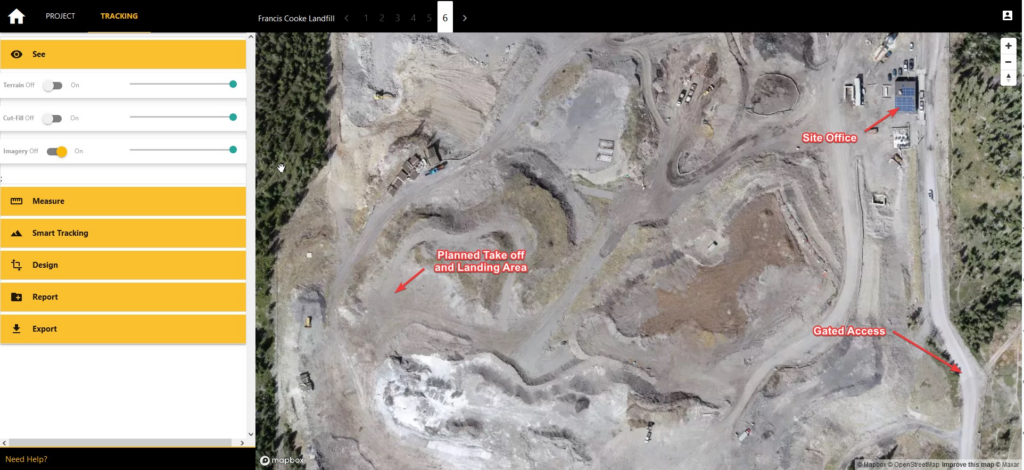
Take a look at the site you’ll access in Civil Tracker, Google Maps, or Google Earth. From this, you will get a good idea of where you want to take off and land from. You may decide to change your take-off location, when you get to the site. It’s much easier to start with a plan and change it, than to start with no plan at all.
Firmware and Software Updates
The autopilot app, drone controller and the drone itself have frequent updates. It’s best to update them all in the office, where you’ll have good Wi-Fi. If you update before heading outside, there’s also less pressure and extra time, if an update doesn’t work the first time.
Ensure that you have the latest version of DJI Fly, and your Autopilot App installed on your iOS, Android or DJI Controller.
Within DJI Fly, you may be prompted to update firmware or the DJI fly safe database. If that happens, follow the step by step guide, which requires a WiFi connection to do so.
Charging The Drone Equipment
Ensure the drone controller and all your drone batteries are fully charged. If you use an external phone or tablet connected to the drone controller, it also must have a full battery. I often joke that dead batteries are the number 1 source of downtime for surveyors and drone mappers, which in the moment, doesn’t end up being that funny.
Checklist
Before you leave the office, have a mental or physical checklist of everything you need to do and take with you.
Arriving at the Drone Mapping Site
Depending on the type of site you are flying at, one of the first things to do is, check in with the site owner and operator, ensuring you have full clearance to be there and fly. After that, drive around and scope out the site as much as possible.
Chose a Staging Location
Pick a take-off and landing location in a quiet and discrete area, with a good line of sight to where the drone will be.
Use both your vehicle and traffic cones to create a buffer and boundary around the staging area. For the takeoff and landing zone, put down a landing pad for the drone, this protects it from dust and debris during takeoff and landing.
Hazard Identification
Identify any hazards that pose a risk to your operation, such as cell towers, power poles, etc. The last thing you want to discover is that your planned take-off and landing zone is the major haul road.
Pre Flight Checklist
It’s time to pull out the drone and prepare it for takeoff. A visual inspection of all equipment is a must. This includes the controller, antennas, camera, landing gear and props, ensuring nothing is damaged or broken.
After powering on the drone controller and drone, open DJI Fly. Ensure the compass, IMU, and GPS are all working. You may need to wait for the GPS to get more satellites or calibrate the IMU and compass. It’s also essential to check and ensure that the max horizontal distance in DJI Fly is ok for your flight. Double-check then return to home elevation. Finally, ensure the home point has been updated, and looks correct on the map.
Pro Tip. If you’re surveying and placing Ground Control Points (GCPs), this must be done before flying the drone. GCPs are beyond the scope of this article and are covered elsewhere.
Manual Test Flight
It’s best practice to perform a short manual test flight to ensure the drone operates correctly. Using the controller, take off, fly to about 10 ft elevation and test all the controls. This means up, down, left and right, etc., then land the drone.
Start the Drone Mapping Flight
Fully close the DJI Fly app and open your autopilot app. Load your mission. Once all the systems are green, start the mission. Often, this is done by pressing the ‘play’ button.
Drone mapping flights can be 100% automated. That means the drone takes off, flies the full grid pattern and comes back to land all on its’ own.
Watch the screen for errors or issues during the flight and scan the surrounding environment. In many respects, this is similar to driving a car.
Check Drone Controller
Check the skies
Rinse and repeat until the flight is done, or the battery is close to 30%
Always start the flight with an estimate of how much will get done with a single battery. If the mission is large enough to need several batteries, try to estimate when you expect to pause the mission and switch batteries.
For multi-battery missions, the process is as follows.
The autopilot will return the drone to the last photo and resume the mission.
After The Flight
Once the drone is back on the ground, there are a few more steps before heading on a long drive home, or back to the office.
Inspect Imagery
You’ll want to back up and inspect the imagery as soon as possible. Remove the micro SD card from the drone and plug it into your computer. Transfer all the mapping photos to a local folder on your computer. Take a look at a sample of the photos to ensure they are clear and in focus.
Make a Map from Drone Photos
In the next step, I’ll show you how to use Civil Tracker to upload your mapping photos and create a drone map. Civil Tracker is drone mapping software that takes hundreds of photos and turns them into imagery and 3d terrain models for viewing and measuring. Our customers are in the Waste Management, Engineering, Aggregate, Mining and Municipal industries. If you haven’t yet, Sign up for a free trial of our drone mapping software.
Our team has over a decade of experience in drone mapping and drone data. If you have any questions, please reach out to us at support@civiltracker.xyz