Measure
After viewing drone mapping data, measuring is the next most useful tool, for most people. Measuring from a drone map is akin to being a virtual surveyor. Rather than having to physically go to the field with survey equipment, you can measure anything anywhere within the drone map. This incredible ability to measure from the data collected is what makes drone mapping so powerful.
Point
Point measurements are very useful for understanding topography, obtaining coordinates and many other scenarios.
A point is a single unique dot on the map. These are similar to placemarks in Google Earth. You can have as many points as you like, within Civil Tracker. The only constraint is that each point must have a unique name.
Creating a Point
To create a point simply go to the measurement functionality, Click on the “+” button and select “Point”
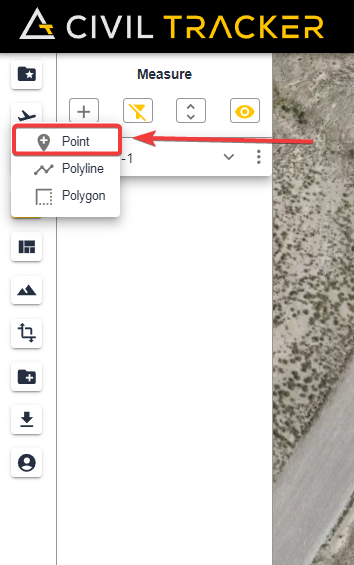
After this, simply place your cursor where you want the point to be and simply click
Information in a Point
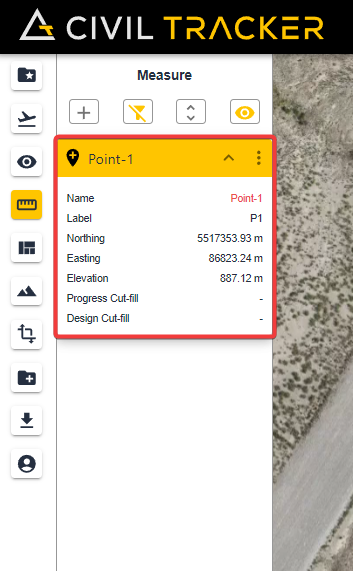
There is valuable information stored within a point measurement.
- Horizontal X / Y positions or Northing and Easting >
- Elevation > elevation of current survey
- Progress cut fill > earth added or removed since previous survey
- Design cut-fill > difference between current drone survey and engineered design elevation.
Lines
Lines add an element of needing at least two points or more. Lines can be used to measure slopes, roads, fences, ponds, or just about anything you can think of. Lines can be two or more points.
Creating a Line
Under the measure tab , click on the “+” button and select Polyline. After that you can start drawing the line. You can start by clicking a point (starting point) and use
- Left Click to bend the line by any angle you want
- Right click to stop drawing and finishing your drawing
After finishing drawing, Just name your Line and click submit.
Editing a Line
Click the nodes to move them around. Click anywhere off the line and on the map to complete the edits.
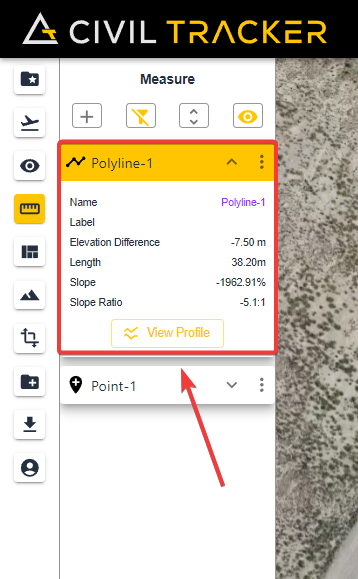
Information in a Line
- Length
- Elevation Change
- Slope in both ratio and percentage formats.
Polygons
The most complex and also most valuable measurement within Civil Tracker. Polygons are closed areas. They are at the core of all volumetric calculations. Read below to understand how to create, and why polygons are so useful.
Creating a Polygon
Under the measure tab , click on the “+” button and select Polygon. Add as many nodes as required and double click the last node (or right click once) to complete the polygon. The last step is to give the polygon a name and optionally a label and color.
Editing a Polygon
Click the pencil icon beside the polygon. The polygon will change to an editable state. Move or add nodes as desired. Once satisfied click anywhere on the map outside of the polygon.
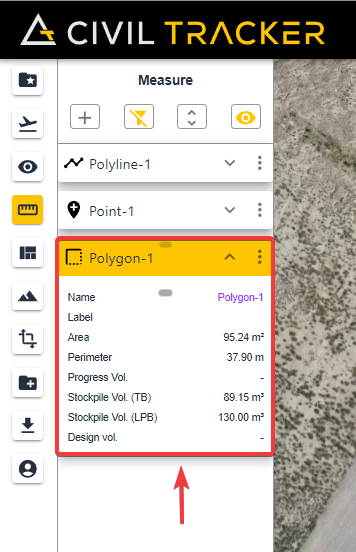
Information in a Polygon
There is large amount of information stored in each polygon measurement, including the following:
- Area > 2D area user preferred units
- Perimeter > Distance around the polygon in user units
- Stockpile Volume TIN > Used for stockpiles or ponds. Civil Tracker uses the elevations of all the nodes in the polygon to create a tin surface. The drone terrain surface is then compared against the interpolated Tin surface and a volume is calculated in between the two surfaces.
- Stockpile Volume Low Point > Used for piles against a slope, connected piles or binned material. This volume calculation method uses the elevation of the lowest node on the polygon as a level flat plane. The volume is then calculated as the difference between the drone terrain surface and the low low point plane.
- Cut Fill Previous Flight > Calculates the volume added or removed between the previous drone surface and the current drone flight. Critical for change detection and earthworks quantity tracking.
- Cut Fill Design > Similar to the previous example except the cut or fill is the measurement between the current drone terrain surface and the engineered design surface uploaded to Civil Tracker.
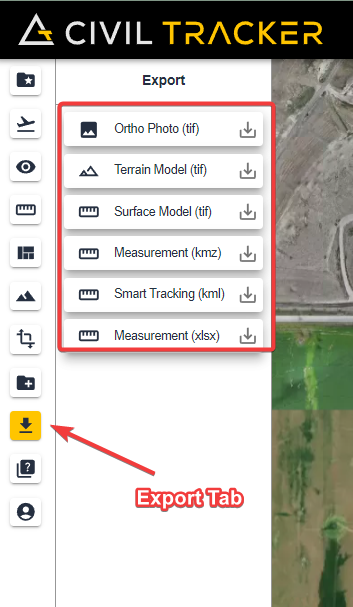
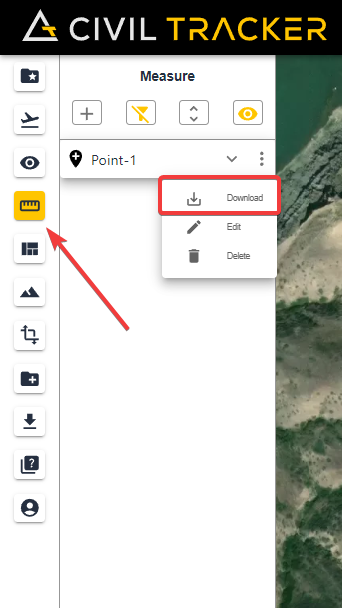
Exporting and Downloading Measurements
Individual points, lines and polygons can be downloaded one at a time, from within the measurement menu.
Simply hover and click on the download button. Individual measurements are downloaded in GeoJSON format.
Alternatively, all measurements can be downloaded by clicking on the exports menu and clicking the download button beside measurements. In this case the measurements are exported in KML format.